The W@M Integration feature will allow you to have your completed calibration certificates uploaded to your W@M portal which allows for better tracking of calibration activities in W@M.
During this Getting Started guide you will be asked for some details that you may or may not already have. The details required are as follows:
- W@M URL
- API URL
- API Key
- Contract Number
- Username
- Password
If you do not have this info at hand, please get in touch with your local Endress+Hauser representative who will be able to assist you in getting these details.
Now that we have the details available, we first need to view the Configuration screen to add these details to the W@M settings. To do this go ahead and follow the steps below:
- First we will select the Configuration screen under the Admin section
- Next we will select the W@M tab
- Now select the Edit button
- Enter the W@M Url, W@M API Url and the W@M API Key you received
- Select the Save button
If you do not see the W@M tab in the Configuration please get in touch by clicking here and we can look into getting this enabled for you.

Next we will look at the company and set up the Contract Number, Username and Password.
Please note that the User you set up for use with W@M will be used for all users in CompuCal who work with a tag for which W@M is set up. Therefore it is recommended to use a User with only the necessary access.
To gets started simply follow the steps below:
- Select the Site screen under the Admin section
- Select the Company you wish to add W@M details to
- Select the W@M tab
- Select the Edit button
- Now go ahead and enter the W@M Contract Number, Username and Password
- Select the Save button
When saving the Company W@M info, if any of the provided details are incorrect you will receive a message stating a reason why the settings could not be authenticated. If this happens and you’d like some assistance please get in touch by clicking here.
Please note that only tags associated to this company will be able to use the W@M integration feature.

The next step is to set the Serial Number and Order Code for the Instrument that you would like to use the W@M Integration with. The Serial Number and Order Code are very important as without those the W@M Portal will not know which Instrument to associated the data with and this will result in no data being sent or it may also cause the sending of the data to W@M to fail.
To set the Serial Number and Order Code, go ahead and follow the steps below:
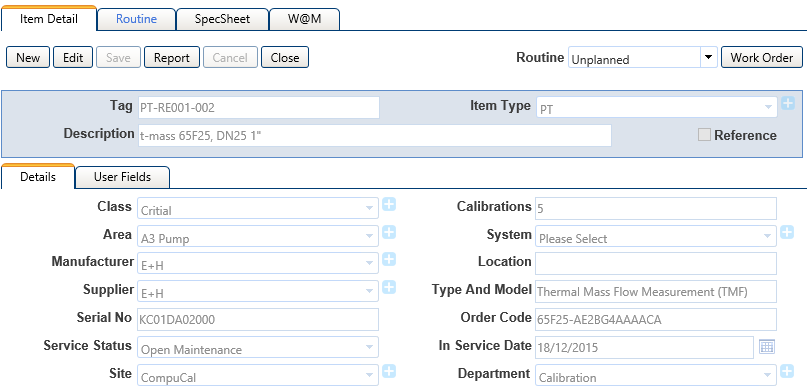
- Select the Instrument Screen under the Setup section
- Select the Instrument you’d like to set up for W@M Integration
- Select the View button
- Now select the Edit button on the Item Detail page
- Next enter the Serial Number and Order Code as it is displayed for the Instrument in W@M
- Select Save
Your Instrument is now ready to be used with W@M. If you want to confirm that the Instrument and your W@M details are set up correctly, simply select the W@M tab for that Instrument. From there you will see the Product Status and you can click the Show Device Details button to view the Instrument in W@M.
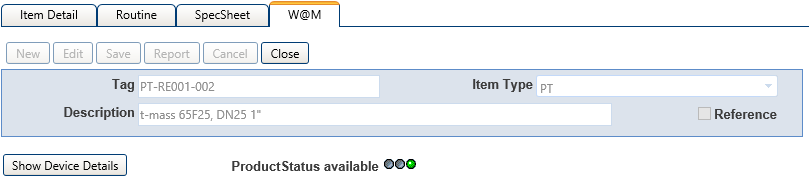
After clicking the Show Device Details button a new window will open up showing the W@M Portal which will already be opened up to the page showing the device you were viewing in CompuCal.

The Attachments tab in W@M will now show all Calibration Work Order certificates for each Work Order. This can be seen in the Name Column where the Work Order number is displayed as it would be for Work Orders in CompuCal. You can then simply click on one of the links available in the L1 column to view the completed Calibration Certificate.

The Logbook tab will now show a list of calibration activities carried out against the Instrument. From here you can view additional details about the Work Order and you can also view the completed calibration certificate.

While using the W@M Integration you may be wondering if the information was sent from CompuCal to W@M successfully, and for this we have added a new column to the Work History screen. The Work History screen will now show a new column by the name of ‘W@M Sent Status’, this column will show the following status’:
- Not Sent: This status means that the Work Order has not yet been completed and no information has been sent to W@M.
- Complete: This status means that the PDF attachment of the Work Order has been uploaded to W@M successfully.
- Failed: This status means that the that the PDF attached of the Work Order did not upload to W@M correctly.
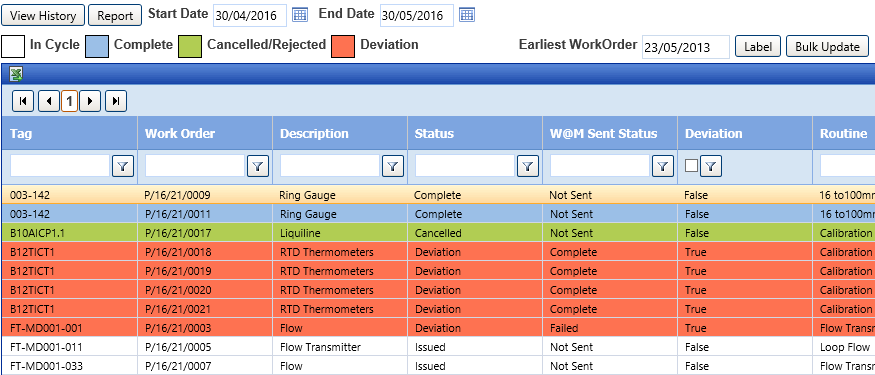
In the event that a number of uploads failed for Work Orders you can quickly and easily try to resend the data to W@M using the Bulk Update button. Clicking this button will cause any Work Orders with a W@M Sent Status of Failed to be uploaded again.
If you do not see the W@M Sent Status column you may need to add it to the list of visible columns for your user. Click here to check out how to manage columns for your users Work Schedule screens.
Please note that any Work Orders completed using Instruments that do not have a correct Serial Number and Order Code set will have a status of Not Sent in the W@M Sent Status column.
Now that you have the Company and Configuration W@M details set up you will be able to simply another Instrument to the W@M Integration by adding a correct Serial Number and Order Code to it and then associate the Instrument with the Company that has W@M already set up.
Still having some troubles or have a question? Submit a Support Request here.
We tweet, follow us on Twitter @CompuCal.
0 Comments